- Home
- Flexible Actions
- Creating New Runtime Alerts Policies
Creating New Runtime Alerts Policies
See below how to configure a policy for runtime monitoring and notifications.
Instruction options:
Step-by-step summary
How to create a new policy
Click the + NEW POLICY button in the upper right corner of the Runtime Alerts page.
On the POLICY screen, set the basic policy information (such as name, classification), monitoring parameters (type, thresholds, periods), and its frequency.
Define the items to be monitored (MONITORED ITEMS), choosing APIs, environments, resources, and operations. When you finish defining all items for monitoring, click ADD ITEM. You can return later to add or delete APIs/events from this policy.
You can add multiple APIs to each policy. To do this, repeat step 3 as many times as needed.
- Understand how fixed and dynamic settings (any and all) work.
- See details about the fields to be filled in.
- There is no limit to the number of APIs that can be monitored by a single policy. However, we recommend keeping the number of monitored APIs per policy to a maximum of 50 to allow effective notification management.
On the ACTIONS screen, select and configure one or more notification delivery methods, which can be:
If you wish, set default messages (for email, Slack, Microsoft Teams, and Webhook). See more details by clicking the links above.

Review the definitions and click SAVE.
WARNINGYou must click SAVE to finish creating the policy. Unsaved settings will be lost.
Also read about how the policy concept works and the definitions and specifics of each field in the steps above.
Video with the steps to create a policy
Detailed description
Click the links above to see the details of each field in the steps to create a policy.

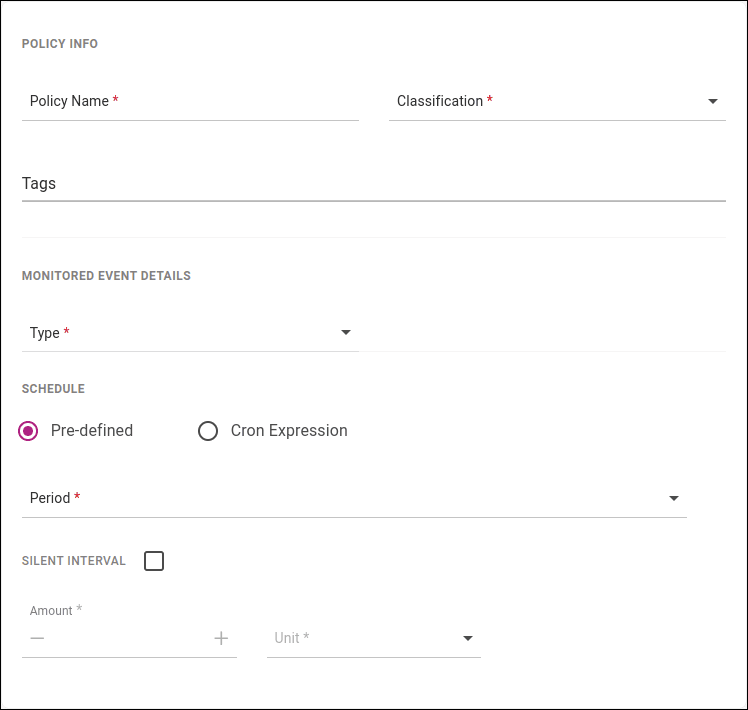
1 POLICY
Policy information
- Policy name: give a name to the policy.
- Classification: choose a classification: Neutral, Success, Warning, or Critical.
- Tag: if desired, define a tag (label). Tags help organize your policies and can be used to find alerts more easily.
Monitored event details
- Type: define the parameter you want to monitor, which can be:
- Total Calls: when the total number of calls within a given period is reached (or not, depending on the settings).
- Availability: refers to the availability of a given operation or resource. An API is considered available if it does not return an error from the
5xxfamily. - Latency: average latency within a given period.
- HTTP Response Status: status code returned from a call. You can enter a specific code (e.g.,
504) or a family (e.g.,5xx). The response code must be between100and599or equal to1xx,2xx,3xx,4xx,5xx.
NOTEYou can add more than one family (e.g., 5xx, 4xx) or code (e.g., 401, 403). If a family is provided, it will take precedence over a specific code (e.g., 5xx will be considered instead of 504).
-
Threshold: monitoring thresholds. Choose a comparison operator, which can be "more than" or "less than" and its value (Amount):
- Total Calls: total number of calls.
- Availability: percentage value of availability.
- Latency: total in milliseconds.
- HTTP Response Status: set the value and choose whether the value is a percentage or number of calls.
-
Period: time interval to be considered for the entered value.
- Amount: set a value between 1 and 1440 (for minutes) or between 1 and 2 (for hours).
- Unit: choose between minutes and hours.
- Past period: to enable this field, select the "Compare with past period" box and enter the past interval you want to compare.
COMPARE WITH PAST PERIOD allows you to compare the reference values registered for monitoring with past periods for notification triggering. In this case, the values entered in the MONITORED OPERATION section fields will not trigger a notification when reached absolutely, but when reached in relation to past performance.
Example
Imagine a total calls alert that sends a notification when there are more than 100 requests using a given operation on a given resource over a one-minute period. If we do not enable comparison with a past period, the notification will be sent whenever more than 100 requests in a minute are made.
However, if we configure a comparison with the same period last week, the notification will only be sent when more than 100 requests per minute are counted compared to the same period the previous week.
This means that if 120 requests are counted in a given minute, but in the same period the previous week there were 80 requests per minute, no notification will be triggered, as the comparison reveals 40 more requests, less than the configured reference value (which is 100 requests).
There are three available options for comparison period, in this order:
- Last period/unit (if the configured period is 2 and the reference unit is minutes, it will be the last 2 minutes; if the period is 5 and the unit is hours, the last 5 hours).
- Same period on the previous day.
- Same period on the previous week.
- Minimum amount of requests to trigger actions
- Specify how many calls with the defined settings need to happen for the actions (sending alerts by the chosen means) to be triggered.
- Field valid only for Availability and Latency types. For Total Calls and HTTP Response Status, the number of calls is defined in Threshold, selecting Calls under unit.
Scheduling
Frequency of state check to generate notifications. Select:
- Predefined
To set a predefined period:
-
1, 5, 10, or 30 minutes
-
1 hour
-
Every day at 00:00
-
Cron Expression
To enter a Cron-type scheduling expression.
A Cron Expression is a string that defines a periodic schedule following a specific format. The Cron Expression field accepts schedules composed of five fields:
To complete the fields, you can use numbers and some special characters:
Some examples:
- Silent interval
You can silence a notification for a predetermined time by enabling the SILENT INTERVAL option. This is useful, for example, when you know there is an availability issue with your API and want to temporarily disable a notification. See how to permanently disable alerts.
To set the silence time, fill in the field that appears with the desired interval, consisting of a number and a unit (minutes or hours).
NOTEThe maximum time that can be set is 24 hours (or 1440 minutes).
If the option remains always on, the alert will be enabled after the configured interval. Then, the next notification triggered by an event will be sent normally and will trigger a new silence period.
Example
Suppose you set a silence period of 4 hours for an alert that sends a notification when more than 20% of requests to a given API return an HTTP error status. For 4 hours, your alert will not generate notifications. Suppose that, after 5 hours, the SILENT INTERVAL field is still enabled and 30% of requests get an error status. In this case, a notification will be sent and this notification will trigger a new 4-hour silence period (from this last notification).

2 MONITORED ITEMS
Add API
Define the items to be monitored. Select:
- API Name: an API. Here the APIs available in the API Platform catalog will be listed.
- Environment: one or more environments available for the selected API.
- Resources: one or more resources.
- Operation: one or more operations.
NOTEFor Environment, Resources, and Operation, you can also choose:
Select All: so that all environments are considered for monitoring fixed monitoring: the monitored items are always the ones specified at the moment of the policy creation).
Any environment: so that any environment is considered for monitoring (dynamic monitoring: updates to the API will be automatically added to the policy).
See the difference between All and Any
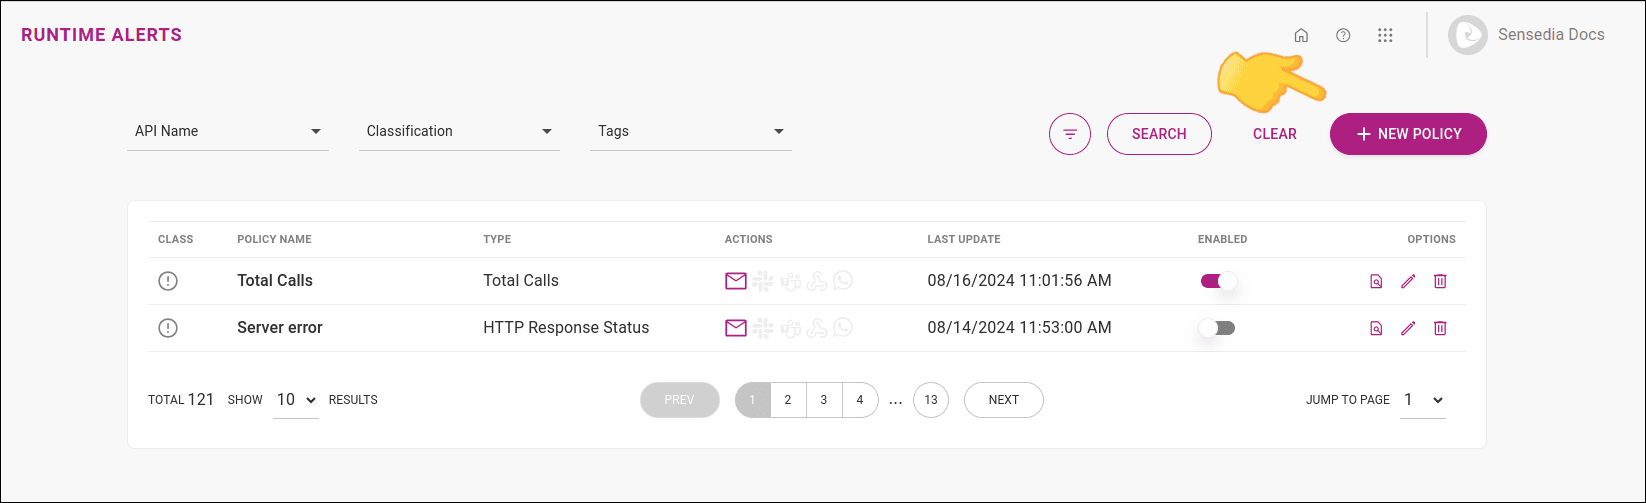
Policy list
The items added for the policy will be available in this list, with the columns:
-
API Name: API name.
-
Summary: number of environments, resources, and operations selected for monitoring. The quantity is not displayed for items with dynamic monitoring—they are described as "any". Items with fixed monitoring are presented with the number representing the total available (of environment, resource, or operation) at the time of policy creation.
-
Actions: actions to edit or delete the item.

3 ACTIONS
The action of sending a notification can be configured and customized at this step.
Follow the steps below to configure an action. Click the links for more details.
Click ![]() next to an action.
next to an action.
Fill in the required fields. Click to see more details about configuring alert delivery for:
Optionally, enable "Add Custom Message" to personalize the message sent with the notification. Available for: E-mail, Slack, Microsoft Teams, and Webhook.
Click SAVE to save the action configuration.
WARNINGSaving the action does not save the policy. To save the policy, click SAVE at the end of the configuration process (step 4 REVIEW).
You can configure more than one action per policy. To configure additional actions, repeat steps 1 to 4.
Click NEXT to proceed to the next step of policy creation: review.
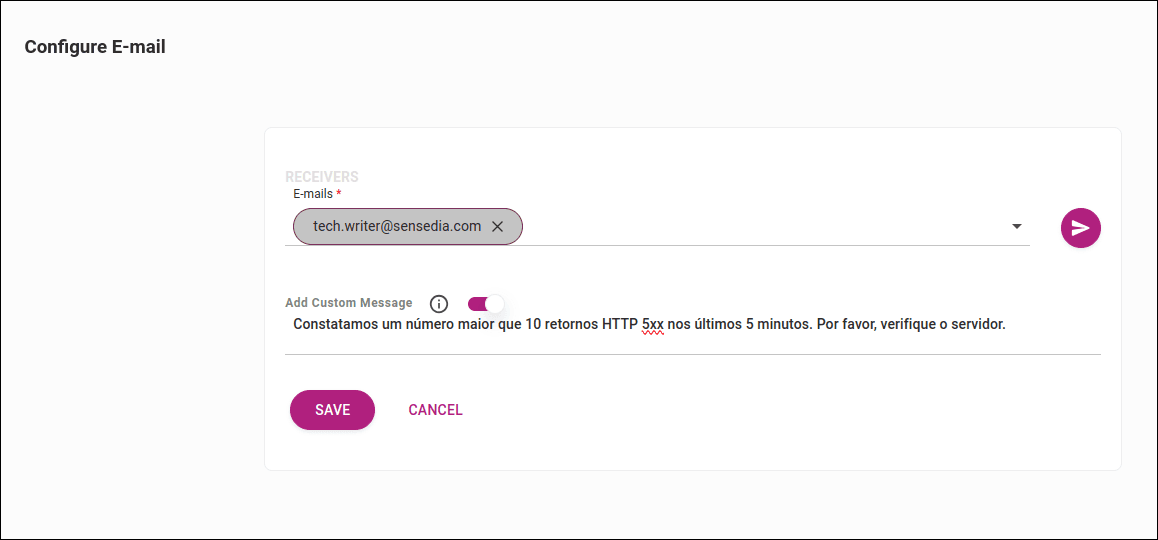
When this action is configured, a notification email is sent whenever an event that triggers an alert occurs. Follow the steps below to configure an email sending action.
Click ![]() and enter one or more email addresses in the E-mails field.
and enter one or more email addresses in the E-mails field.
TIPUse commas to separate email addresses.
If desired, include a custom message by clicking ADD CUSTOM MESSAGE.
NOTEThe message can be written in plain text or HTML. See an example:
Click SAVE.
NOTEOnly one notification email will be sent per policy (and not per operation).
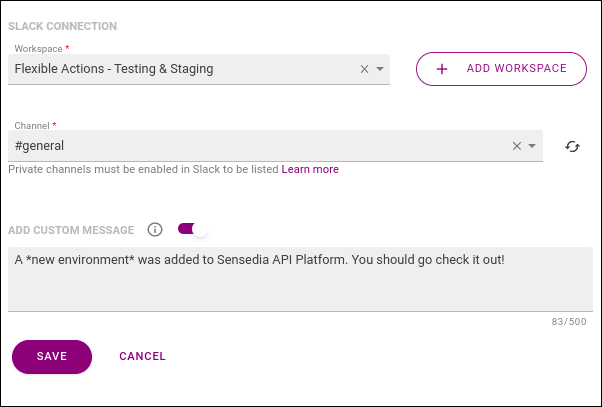
Slack
When this action is configured, a notification is sent to a Slack channel whenever an event that triggers an alert occurs.
Follow the steps below to configure a Slack sending action:
Click ![]() and select the Slack workspace to use, or add a new one by clicking + ADD WORKSPACE.
and select the Slack workspace to use, or add a new one by clicking + ADD WORKSPACE.
See more details on adding a workspace.
Choose a channel. By default, only public channels are displayed.
See how to add a private channel.
NOTEOnly one channel can be selected per alert.
If desired, include a custom message by clicking the toggle next to ADD CUSTOM MESSAGE to enable the field.
See an example:
Click SAVE.
To send a test message: next to "Slack", click the ![]() to expand and then click SEND TEST MESSAGE.
to expand and then click SEND TEST MESSAGE.
Microsoft Teams
When this action is configured, a notification is sent to Microsoft Teams whenever an event that triggers an alert occurs.
Follow the steps below to configure a Microsoft Teams sending action:
In Microsoft Teams, create an incoming webhook.
See the Microsoft Teams documentation.
Click the ![]() icon in the "Incoming Webhook URL" field and enter the URL you received from Microsoft Teams when creating the incoming webhook.
icon in the "Incoming Webhook URL" field and enter the URL you received from Microsoft Teams when creating the incoming webhook.
If desired, include a custom message by clicking the toggle next to ADD CUSTOM MESSAGE to enable the field.
See an example:
Click SAVE.
To send a test message: next to "Microsoft Teams", click the ![]() to expand and then click SEND TEST MESSAGE.
to expand and then click SEND TEST MESSAGE.
Webhook
When this action is configured, whenever an event that triggers an alert occurs, an HTTP POST request is sent to the endpoint you specify.
With this alert, you can trigger a specific API. The payload of this request will include the monitored parameters of the alert and an additional (optional) message.
Follow the steps below to configure a webhook:
Click the ![]() icon and enter the endpoint URL.
icon and enter the endpoint URL.
If desired, select a credential or create a new one by clicking + NEW CREDENTIAL.
See more details on creating a webhook credential.
If desired, include a custom additional message by toggling ADD CUSTOM MESSAGE to enable the field.
See an example:
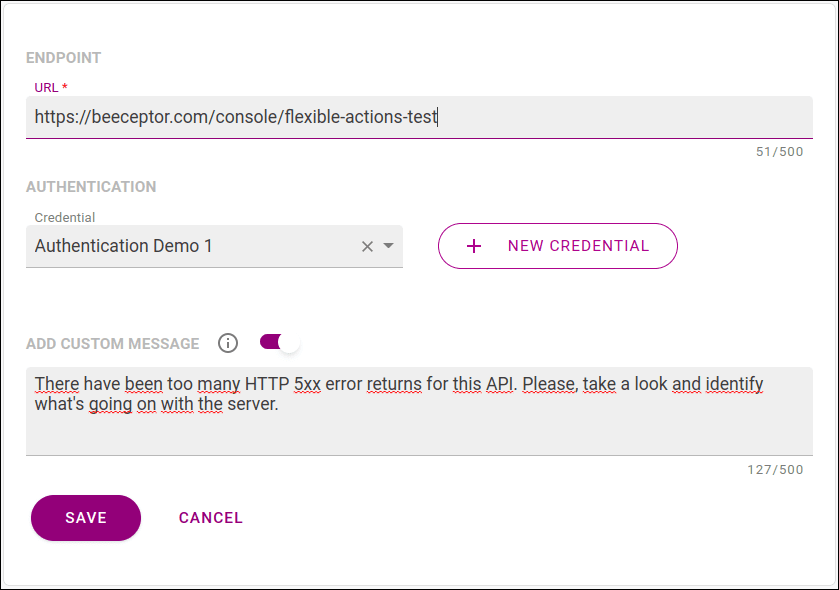
NOTEThe message will be included in the request payload, identified by "customMessage".
Click SAVE.
If desired, view a sample JSON schema or JSON. Click VIEW SAMPLE and select a tab.
When this action is configured, whenever an event that triggers an alert occurs, a message is sent by WhatsApp to one or more numbers.
Follow the steps below to configure a WhatsApp sending action:
Click the ![]() icon and select one or more contacts.
icon and select one or more contacts.
Contacts are listed in the Phone Catalog. See how to add a new contact.
Click SAVE.
If you want to send a test message: next to "WhatsApp", click the ![]() to expand and then click SEND TEST MESSAGE.
to expand and then click SEND TEST MESSAGE.
NOTETo use WhatsApp as a notification channel, you must activate the plan for your environment. Contact us for more details.

4 REVIEW
Check the details and parameters of the policy.
If you need to edit, go back to the previous steps by clicking the breadcrumb at the top of the page.
When finished, click SAVE to save the policy.
WARNINGYou must click SAVE for the settings to be saved.
The created policy will be available in the policy list.
How it works
After creating a policy, the monitoring event will be executed according to the indicated parameters for all selected items (APIs/Operations). If it is detected that a certain API/operation fits this event, the notification chosen in the policy will be triggered individually for each API/operation.
See an example (by video or text).
I created a policy to be executed every 5 minutes for the following APIs/Operations (Monitored Items):
-
API Orders 1.0
- Environment: Production
- Resource: Orders
- Operation: GET/list and GET/items
-
API Delivery 1.0
- Environment: Any
- Resource: Any
- Operation: Any
-
API Tokens 1.0
- Environment: All
- Resource: Tokens
- Operation: All
This policy monitors if the number of calls exceeds 10 calls with status code 200 in the last 5 minutes.
Example scenarios
1. API Orders 1.0, Environment Production, Resource Orders, Operation GET /list and GET /items
Suppose:
- For the GET/list operation, the condition is true (more than 10 calls with status code 200 in the last 5 minutes) at the time of verification.
- For the GET/items operation, the condition is false.
Then the notification will be sent only for the GET/list operation. Note that only the API deployment to the Production Environment will be monitored.
2. API Delivery 1.0, Environment Any, Resource Any, Operation Any
Suppose:
- For Operation (Any), some operation exceeded 10 calls with status code 200 in the last 5 minutes at the time of verification.
Then a notification will be triggered for each operation individually. Note that, as the check is performed in any Environment, notifications will also be sent individually for each Environment and Operation.
3. API Tokens 1.0, Environment All, Resource Tokens, Operation All
Suppose:
- There was some operation of the Tokens Resource that exceeded 10 calls with status code 200 in the last 5 minutes at the time of verification.
Then a notification will be triggered for each of these operations that met the policy's true condition.
Operations of this resource that did not exceed 10 calls with status code 200 will not be included in the notifications.
With the selection of "All" for environments and operations, only the environments and operations existing at the time of policy creation or editing will be considered. If new environments or operations are created after that, they will not be included in the monitoring.
On the other hand, by choosing "Any" in any API criterion (Environments, Resources, Operations), all options for that API will be considered in the monitoring, including those created after the policy was created or edited.
See more details in Fixed or dynamic settings.
Example situations
Fixed or dynamic settings (all or any)
The All and Any options define whether the policy is fixed (the parameters that trigger the alert are always the same as you configured/edited) or dynamic (the parameters are automatically updated with the API).
-
All: by selecting all items (in Environment, Resource, and Operation) to be monitored by a policy, all API items selected at the time of policy creation or editing will be considered for triggering the alert. Items created after this definition will not be included in the monitoring.
-
Any: by selecting any item (in Environment, Resource, and Operation) to be monitored by a policy, any item of the API will be considered for monitoring, including additions to the API that occur after the policy is defined.
Using the Any option gives greater dynamism to monitoring, as it will be automatically updated when new operations are added to the API.
The All option allows you to keep the monitoring parameters fixed as initially configured. New additions to the APIs must be manually configured to be included in alert triggers.
See an example of how these options work in an API monitoring scenario in the video (at 02:00).
The following features are temporarily unavailable with this update:
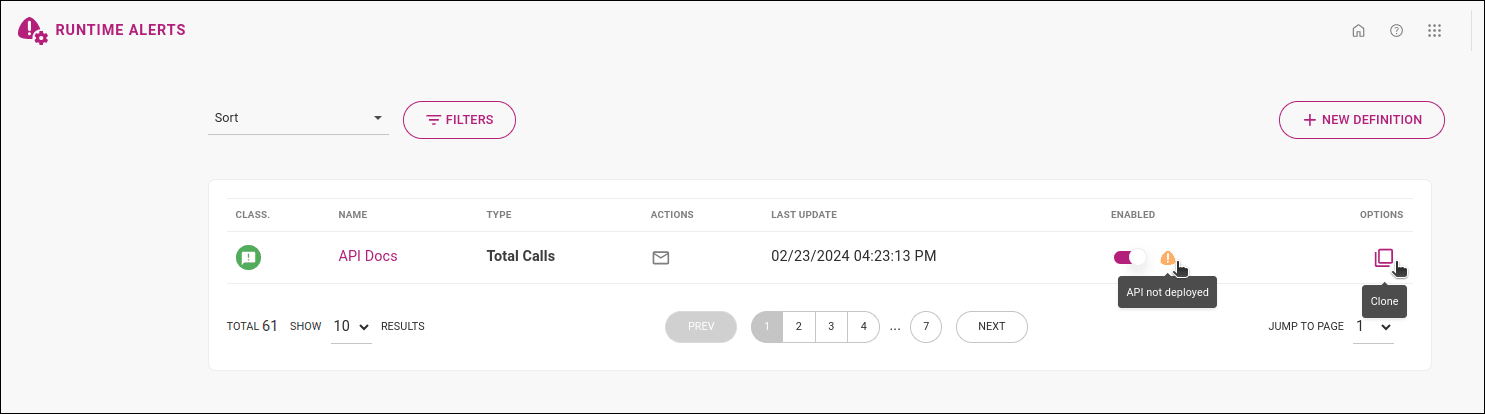
Indicator that notifies when an API operation is not deployed in the selected environment for monitoring.
Option to clone a policy.
These features will return in future releases.