- Home
- Events Hub
- Policies
Policies
Policies are tools for managing two aspects of the event reception and distribution process:
- Publisher authorization: security validations ensure that only authorized publishers can send events to the Events Hub.
- Event delivery: automatic retries that the system should perform if the first event delivery attempt fails.
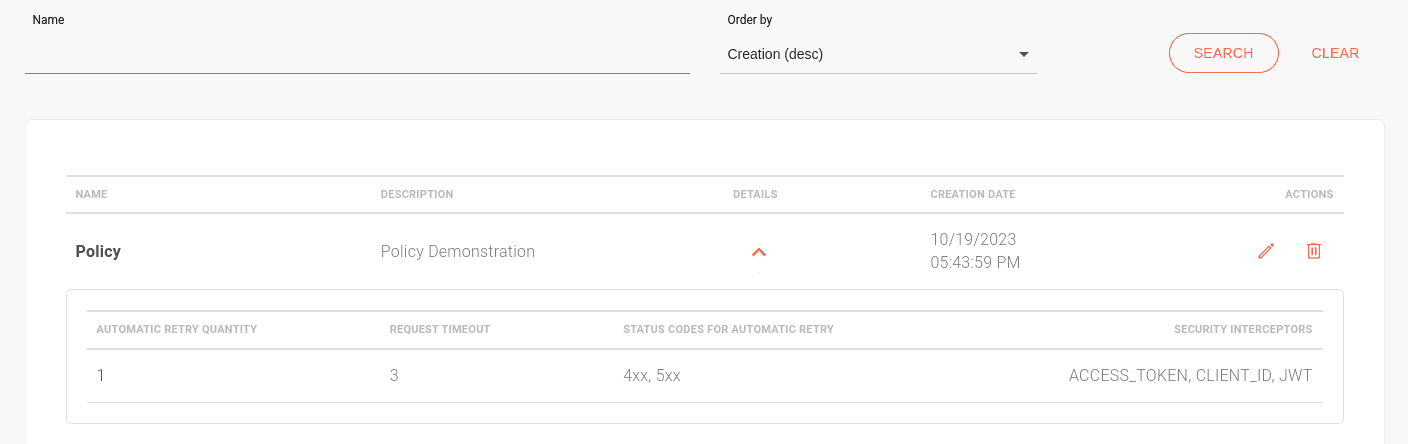
Policy listing
The Policies screen displays all existing policies in order of creation. In the Order by field, you can select the desired sorting option:
-
Creation (desc): default. Lists policies from the most recent to the oldest creation date.
-
Creation (asc): lists policies from the oldest to the most recent creation date.
-
Name (desc): lists policies alphabetically, from Z to A.
-
Name (asc): lists policies alphabetically, from A to Z.
You can also search for policies by name using the NAME field.
The DETAILS column contains the ![]() icon, which displays the settings of the selected policy.
icon, which displays the settings of the selected policy.
The ACTIONS column contains icons for editing and deleting policies.
Security options
Interceptors are used for publisher authorization. Five types are available:
- Access Token Validation
- Client ID Validation
- OAuth Validation
- JWT Validation
- IP Filtering Validation
Authorization endpoints are defined by context on the Authorizations screen. It has two sections:
- OAUTH: For the OAuth Validation, Client ID Validation, and Access Token Validation interceptors.
- JWT: For the JWT Validation interceptor.
IMPORTANTUsing security interceptors is optional. However, if you add policies to your handler, you must configure the authorization URL linked to the interceptor. Except for "IP Filtering Validation," all depend on this configuration to function. If you plan to use the Sensedia API Platform for this, see how to [obtain the authorization URL](/docs/events-hub/authorizations#obtaining-the- authorization-url-using-the-sensedia-api-platform).
Automatic delivery retries
When the first attempt to deliver an event to a subscriber fails, the Events Hub can retry delivery based on the registered settings. These settings include:
- Number of attempts (up to 10 times).
- HTTP status codes that trigger a retry.
- Request timeout.
The Events Hub retries delivery until it succeeds or reaches the maximum number of automatic attempts defined in the settings. To increase delivery chances, the system uses the exponential backoff algorithm, which increases the wait time between retries to avoid network congestion.
If all automatic attempts fail, you can manually retry delivery through the Delivery Retry screen.
Creating a policy
To create a new policy:
Click the [+] button.
Fill in Name and Description (optional). The name must be unique. You cannot create two policies with the same name.
If desired, configure security and delivery options for the policy. See below:
Security
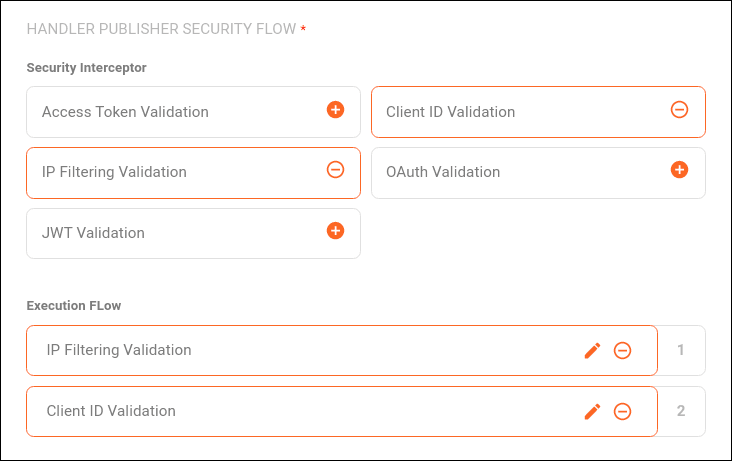
The HANDLER PUBLISHER SECURITY FLOW section includes the security interceptors that can be added to the flow.
TIPSee how to use the Sensedia API Platform to provide [publisher authorization](/docs/events-hub/authorizations#obtaining-the- authorization-url-using-the-sensedia-api-platform).
Click the ![]() icon next to the interceptor you want to apply. You can add more than one interceptor.
icon next to the interceptor you want to apply. You can add more than one interceptor.
Available interceptors are listed below:
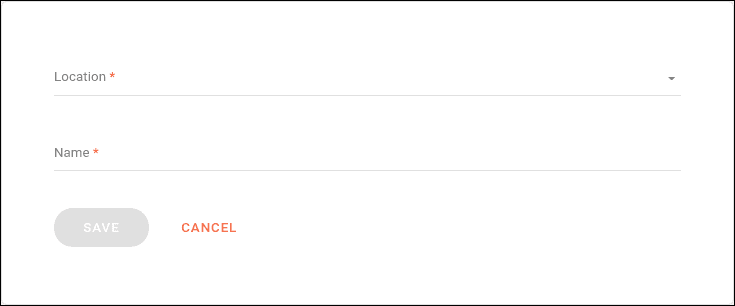
Client ID Validation
Validates a client ID passed in the request. When selected, you must specify:
-
Location: Where the client ID will be passed, such as any (all options selected), cookie, header, or query param.
-
Name: The name under which the client ID value will be passed.
Access Token Validation
Validates an access token passed in the request. When selected, you must specify:
-
Location: Where the access token will be passed, such as any (all options selected), cookie, header, or query param.
-
Name: The name under which the access token value will be passed.
OAuth Validation
Validates client_id and access_token passed in the request headers.
The URL providing validation must be included on the Authorizations page, and no fields need to be registered.

JWT Validation
Validates the JWT token (sent in the Bearer format) passed in the request. The URL providing validation must be included on the Authorizations page. When selected, you must specify:
-
Location: Where the token will be passed, such as header, default JWT header, or query param.
-
Name: The name under which the token value will be passed.
IP Filtering Validation
A list of IPs that can or cannot send requests.
-
In the List Type field, choose between:
-
Block List: A list of IPs whose requests will be blocked.
-
Allow List: A list of IPs allowed to send requests.
-
-
IP List: Add IPs separated by commas.

Selected interceptors are displayed in the Execution Flow section. You can:
- Edit them by clicking the pencil icon.
- Disable them by clicking the minus icon.
- Reorder them by dragging the interceptor to the desired position.
Validations occur in the order they appear on the screen. If any validation fails, the request is interrupted.
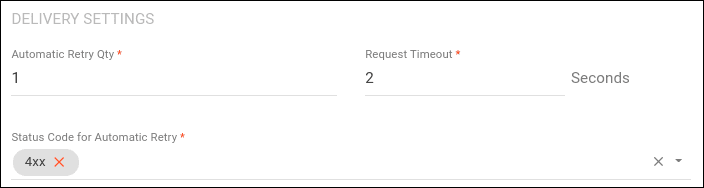
Delivery settings
The Delivery Settings section defines the maximum number of automatic retry attempts and the status codes that trigger these attempts.
Configure the fields:
-
Automatic Retry Quantity: the number of automatic attempts if the first delivery fails. Up to 10 attempts are allowed.
-
Requisition Timeout: the maximum wait time for the subscriber URL's response during each delivery attempt. Up to 30 seconds.
-
Status Code For Automatic Retry: HTTP status codes that should trigger an automatic retry.
-
Separate multiple codes with commas.
-
Use "xx" to register a family of codes, e.g.,
4xx, 5xx. -
Codes in the
200family are not accepted because2xxresponses indicate successful delivery and do not require retries.
-
Recommended status codes
The Status Code for Automatic Retry field allows codes from the 400 and 500 families.
However, not all are suitable for retries.
Below are recommended and non-recommended codes:
Recommended
Not Recommended